Sunday, August 28, 2011

We be jammin'

So i ventured into a new realm for myself this weekend... i made and canned my very first Blueberry Jam!  My first in-laws gave us a bucket (and by bucket i mean 2 gallon pail!!) full of fresh picked blueberries.  I baked some goodies like a buckle and a crisp, and since i ended up eating most of those dishes i decided to find some other use for the berries.  I decided to try jam and I used this awesome link as my guide.  I won't go into the recipe since it's all spelled out on the list, but i would like to show you in pictures what i did (cuz i'm so proud of myself for being all domestic-like)

This is what 3.5lbs of blueberries look like!

Sanitizing the jars... i used little quilted pint jars... so cute!

Other supplies... lots of sugar, 2 packs of pectin, and my super handy little canning tool set which includes a jar grabber, magnetic lid grabber, funnel, and this little tool that measures head space in the jar.  Throw in Z-man's little ben10 toy and we are good-to-go!

Supervision is a must...we are working with boiling water after all, so your best friend should be there to make sure things go smoothly

the process can get tiring, so just get comfy there...

 She knows how to do comfort.

 anyway, an insane amount of sugar goes into this recipe... 7 cups!!
 Mashed up the berries in the lazy way, a la oster!

Voila! Berries ready to be made into jam!

Gather up your other necessities... pectin, mixed in a bowl with 1/4c of the sugar (very important so it doesn't clump!!) 1/4c lemon juice and 1/2c water

Berries go into the biggest pot i own, along with the pectin mixture, lemon juice and water.  Stir and boil.  I stirred pretty much constantly because we have a ridiculous glass cooktop and just about everything burns on it...no temperature control with this baby... i want to cook on gas again... but that's a grumble for another day!

Keep a cup of ice water nearby with a spoon in it.  This will be used to test the jam to see if it's the right "thickness"  When i tested mine, it was too runny for our tastes so i added more pectin mixed with sugar and boiled it again... tested and it was still too runny, so at the end i used the second package of pectin and boiled it an additional 2 times.

Filled jars!  After this i put on the lids and rings...

and into a boiling water bath the jars went!
(this is the only picture i have of the jars with their lids... fail on my part)


I do however, have a picture of the pickles i made last night... apparently i got the canning bug yesterday!
Those pickles were INCREDIBLE and made with this recipe.  Go make them... they are so worth it!!


Friday, August 5, 2011

A new pattern!!

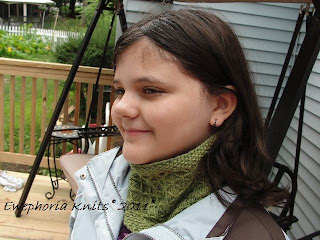
I came up with a new pattern!  It's a fun and functional cowl.  It will keep your neck and face warm in the coming winter, you can even pull it up over your head for a makeshift hat!


Many thanks to my little mini-me for modeling winter gear in August!
So, here is the pattern... it has not been tested so if you find any mistakes please let me know!!  I would love to see anything you make from this pattern!!!


Lattice Cowl

4oz Worsted weight yarn
6 16” circular needle
8 16” circular needle
use whatever needle you need to get gauge. I get 5spi on 8's.

Cast on 103 stitches on smaller needle (a little loosely, remember, this needs to go over your head!), pm and join in the round. Work in seed stitch for 1.5 inches. Work last stitch of seed stitch pattern as k2tog or p2tog, keeping in the pattern, 102 stitches remain. Switch to larger needle.
Row 1: knit around
Row 2:sl5 keeping working yarn in front, k1. Repeat around
Row 3: knit around
Row 4: k2 *pick up float on right needle, lift up and knit the next stitch, allowing float to go behind worked stitch, k5. Repeat from * around to the last 3 stitches, k3.
Row 5: knit around
Row 6: k3, *sl5 keeping working yarn in front, k1. Repeat from * around to the last 3 stitches. sl3 keeping the working yarn in front.
Row 7: Sl2 keeping the working yarn in front, knit around.
Row 8: k5, *pick up float on right needle, lift up and knit the next stitch, allowing float to go behind worked stitch, k5. Repeat from * around.
Continue working rows 1-8 of the pattern until the piece measures 6 inches or longer if you prefer. Make sure you end of row 4 or 8 of the pattern.
Switch back to smaller needles. Kfb, then k1p1 around, end in k1, 103 stitches. Continue in seed stitch for 1.5 inches.
Bind off using a stretchy bind off. I prefer a sewn bind off. A great tutorial can be found here

Here's a wonderful tutorial for the lattice stitch:

Remember, this is only a cowl and feel free to play with the pattern! This would look great with a ribbed border edge instead of seed stitch, or you could even try garter stitch or just knit plain for a couple inches for a rolled edge.